In the realm of lighting design, the exploration of techniques and elements holds profound importance, and one such key consideration is volumetric lighting. This captivating lighting method goes beyond mere illumination; it plays a pivotal role in shaping the ambiance, depth, and visual narrative of a space.
As we delve into the intricacies of “What is Volumetric Lighting in Lighting Design,” we unravel the reasons why this particular aspect demands our attention and appreciation in the creative realm of lighting design.
What exactly is volumetric lighting?
Volumetric lighting refers to the phenomenon where light assumes a cone or beam shape, enriching the perception of volume within a particular environment. In simpler terms, it manifests as beams of light that illuminate the space between a light source and its target.
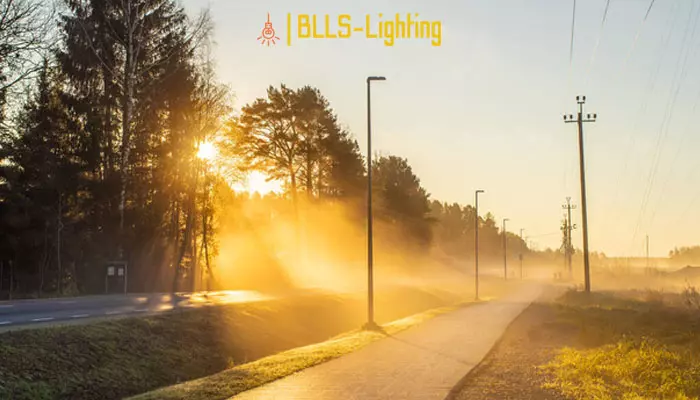
This lighting technique is commonly employed to generate “god rays” or radiant beams by directing light through atmospheric elements such as fog or haze.

Example: Misty Forest Scene
Imagine a dense forest with sunlight streaming through the trees. As the sun rises or sets, the atmosphere is filled with mist or fog, creating a volumetric lighting effect. The sunlight interacts with the water droplets in the air, scattering and diffusing the light rays. This results in visible rays of light that illuminate the mist, creating a magical and ethereal atmosphere.
In a 3D rendering software like Blender, an artist could recreate this scene by placing a light source to represent the sun, adjusting its properties to mimic sunlight, and enabling volumetric rendering. By adding a volumetric material to the mist or fog in the scene, the artist can achieve a realistic representation of how light interacts with the atmospheric elements, creating a visually stunning and immersive forest scene with volumetric lighting effects.
What are the applications of volumetric lighting?
Enhancing Depth: Volumetric lighting is utilized to add depth to visual scenes, providing a three-dimensional quality and a sense of space.
Guiding Viewer’s Attention: This lighting technique serves to direct the audience’s focus by strategically illuminating specific areas, guiding the viewer’s eye towards key elements within the scene.
Setting Tone and Aesthetics: Volumetric lighting contributes to the overall tone and aesthetics of a composition, influencing the mood and ambiance through the creative use of light and shadow.
Volumetric lighting contributes to the realism of a scene by simulating the way light interacts with particles in the air, such as dust or mist, creating a more immersive experience for the viewer. To further understand the interplay of light in creating realism, it’s essential to grasp the concept of diffuse lighting. So, let’s explore now: what is diffuse lighting?
Benefits of volumetric lighting
Volumetric lighting stands out as a powerful cinematic lighting method with diverse effects. This technique allows us to visually perceive beams of light radiating from a source towards another section of the frame. Let’s explore some key benefits derived from this captivating lighting effect.

Creating depth
The utilization of volumetric lighting serves to emphasize three-dimensional space within a visual composition. When incorporated into a shot, it has the remarkable ability to introduce significant depth, capturing the audience’s attention more profoundly.
Renowned cinematographer Roger Deakins, celebrated for his mastery in the field, employed volumetric lighting to remarkable effect in a scene from Skyfall (2012), enhancing dimension and depth in the frame.
Examining the still image, it becomes evident that volumetric lighting achieves greater depth when the light source is directed either towards or away from the camera, rather than laterally across the frame.
Directing the eye
The precisely targeted path of volumetric lighting renders it a highly effective instrument for directing the viewer’s gaze. Comparable to a spotlight, this lighting technique allows for the illumination of specific details or subjects through the focused beams of light.
Setting Mood and Style
Volumetric lighting plays a dual role, adding both exposure and texture to a visual frame. Consequently, it becomes a valuable tool in shaping the tone and aesthetic of a film. In black and white cinema, this lighting harmonizes with deep contrasts and evokes mysterious tones.
Contrary to being exclusively associated with harsh lighting and shadows, volumetric lighting offers versatility. Cinematographers often leverage it to achieve a painterly effect, introducing a distinct quality to the shot that transcends conventional illumination.
Creating Volumetric Lighting: A Practical Guide
In essence, achieving volumetric lighting involves just three key components: your light source, the atmospheric conditions, and the way you mold and direct the light. Let’s delve into the methods for achieving each of these elements.
Light source
The key to achieving volumetric lighting lies in having a powerful, focused, and singular light source. Multi-source LED panels may not be sufficient for this purpose.
While natural sunlight can sometimes produce volumetric lighting, it presents challenges due to its constant movement throughout the day.
To overcome this, we recommend opting for robust lighting equipment such as the ARRI 1K or 2K fresnel, or the ARRISun HMI. For a practical example, observe how the team at PremiumBeat employed the ARRISun HMI Light to create striking volumetric lighting in the video provided below.
Atmosphere
The atmosphere plays a crucial role in obtaining the distinctive beam shape characteristic of volumetric lighting. While fog can contribute to this effect, the use of artificial haze from haze machines is optimal, as the haze lingers in the air for a longer duration.
A helpful resource on this topic is provided in a video by Aputure, which delves into the significance of atmosphere in mastering this lighting technique. The video also offers insights into alternative elements such as smoke, dust, or dirt, which can be utilized if haze is not available to achieve a similar effect.
Shape the light
In the final step, it’s crucial to shape the light to achieve the desired volumetric lighting effect, especially if you lack control over the light beam. Barn doors prove effective in shaping a more focused and spotted beam of light. If barn doors are unavailable or you seek further control, employing flags to eliminate unwanted light is a practical solution.
Another tool in shaping light is the use of cookies, also known as cucoloris. These are essentially flags with cut-out patterns that cast shadows, providing an excellent method for creating natural or textured lighting.
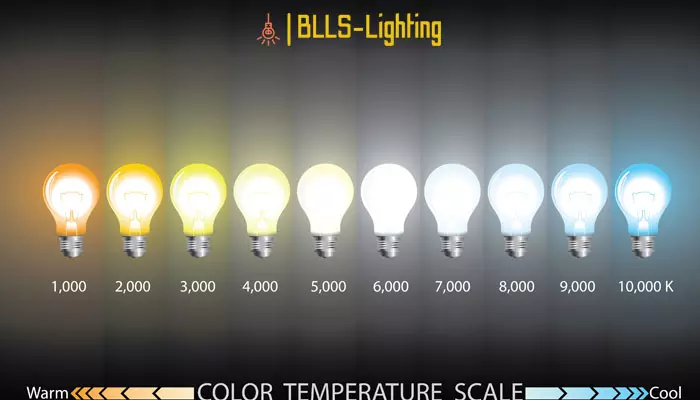
For further insights into lighting terminology and concepts, including the significance of CCT (Correlated Color Temperature), explore our guide on “what is CCT in lighting.”
How do I create volumetric lighting in Blender?

Creating volumetric lighting in Blender involves several steps, and the process may vary slightly depending on the version of Blender you are using. Here is a detailed description of how to create volumetric lighting in Blender:
- Open Blender and Set Up Your Scene: Launch Blender and open the project where you want to add volumetric lighting. If you’re starting a new project, set up your scene with the necessary objects and a suitable camera angle.
- Select the Light Source: Choose the light source in your scene. Typically, a point light or a spot light works well for creating volumetric effects. You can add a new light by pressing Shift + A, selecting Light, and then choosing Point or Spot.
- Enable “Use Nodes” for the Light: With the light selected, go to the Light properties in the Properties Editor. Enable “Use Nodes” to access the node editor for the light. This step allows you to control the volumetric properties of the light.
- Adjust the Light Strength: In the node editor, you’ll see the light node setup. Adjust the Strength parameter to control the overall intensity of the light. A higher value will result in stronger volumetric effects.
- Enable “Volumetric” in the Render Settings: Go to the Render Properties tab in the Properties Editor. Under the Volumetrics section, enable the “Volumetric” checkbox. This step activates volumetric rendering in your scene.
- Adjust World Volume: Still in the Render Properties tab, scroll down to the Volume section. Here, you can adjust the Volume Scatter and Volume Absorption settings to control how light interacts with the volume in your scene.
- Fine-Tune Volumetric Settings: Back in the node editor for the light, you can add more nodes or adjust parameters to fine-tune the volumetric effects. Experiment with the Density and Anisotropy settings to achieve the desired look for your scene.
- Render Your Scene: Once you are satisfied with the volumetric lighting setup, you can proceed to render your scene. Click on the Render button to generate the final image or animation.
Conclusion
Implementing these techniques equips you with the skills to establish your own volumetric lighting setup. Understanding the impact of this lighting and mastering its execution empowers you to capture cinematic shots even within more constrained budgets.
As you explore this lighting technique, observe how your favorite filmmakers and cinematographers integrate volumetric lighting into their work. This observation will provide valuable insights into the strategic use of volumetric lighting in various projects.