In the realm of lighting, the term “diffused light” holds more significance than one might initially realize. It transcends the boundaries of mere illumination, impacting the mood, aesthetics, and functionality of a space.
Understanding diffused light and its applications is not just for enthusiasts of interior design; it is a concept that can influence our daily lives in subtle yet profound ways. This form of lighting has the power to soften shadows, reduce glare, and create a more evenly illuminated environment.
Join us as we delve into the world of diffused light, exploring why it deserves your attention and how it can transform the way you perceive and experience the spaces around you.
What is diffused light?
Diffused light refers to light with a uniform concentration throughout its beam. Also recognized as “soft light,” it evenly scatters light across a surface or subject, resulting in softened shadows and a more flattering image.
In contrast, hard light creates sharp shadows and a more focused light distribution. Neither soft nor hard light is inherently superior; the choice depends on the desired look and feel for the image.
Impacts of Diffused Light
Diffused light finds widespread use in interviews, commercials, and films for several reasons, primarily owing to its flattering quality. Soft light minimizes the harsh definition of wrinkles and facial features, resulting in a more aesthetically pleasing appearance.
Another significant effect of employing soft light is the broader beam angle it provides. This proves beneficial when illuminating larger areas, especially if your lights have a narrow and concentrated spread.
When a spotlight is passed through diffusion, it becomes capable of exposing more extensive areas.
In cinematography, the avoidance of harsh shadows is often crucial to maintain the intended mood or style of a scene. Soft light, with its ability to create subtle and less distracting shadows, becomes a preferred choice.
A video by DSLR Video Shooter delves into the effects of soft light and offers valuable tips on its creation.
However, it’s essential to note a potential drawback of diffusing light sources: a reduction in output. The addition of diffusion material softens the light but simultaneously decreases the exposure on the subject.
To counteract this, it is advisable to use stronger light sources when planning to diffuse them, ensuring proper scene exposure even after the diffusion process.
Understanding the Origins of Light Diffusion
When a light beam encounters a smooth surface, the majority of it reflects back with the same concentration, resulting in what is known as specular reflection. This type of reflection produces direct and intense light, with a mirror serving as a common example of a smooth surface leading to specular reflection.
Conversely, on rough surfaces, even microscopic irregularities contribute to the overall surface roughness. While this phenomenon adheres to the law of reflection, wherein each ray reflects back at the same angle it initially struck the object, the direction of reflection varies.
As a result, diffuse light is created—scattered light that undergoes a change in direction due to the surface irregularities. This scattering process is responsible for the diffusion and softening of the light beam.
Why Filmmakers Should Embrace Diffused Light
Why Direct Light Poses Challenges in Cinematography
As a cinematographer, your objective is to immerse the audience in the narrative, making them forget they’re watching a film. The use of diffused light facilitates this by concealing the origin of each light source striking the subject.
Direct light tends to cast harsh, unnatural shadows, earning it the descriptor “sourcey” as it blatantly reveals the placement of off-screen light heads. This becomes particularly distracting when peculiar shadows obstruct an actor’s face, hindering the audience’s ability to perceive the conveyed emotions.
Additionally, direct light has limitations in creating a balanced and even frame around the subject. Scattered, diffuse light gracefully fills the space, avoiding overwhelming brightness or dark voids. Achieving a uniformly lit frame is crucial for cinematic shots, enhancing the depth of the scene. This can be challenging when relying solely on direct light sources, especially in confined spaces.
Attempting to address a dark area of the frame with a direct light source may inadvertently create the opposite issue.
To mitigate these challenges, utilizing light diffusers on both newly-added sources and existing ones is a more effective approach. Diffused light permeates every corner, providing a natural scene without compromising artistic focus or plunging the image into excessive darkness.
Examples of Diffused Lighting in Video
While the previous explanation might not be textbook material, it covers enough basics to provide an understanding of the significance of diffused light. Now, let’s delve into the exciting part—seeing it in action and exploring what you need to enhance the quality of your lighting equipment.
Even from the image above, a notable difference is evident. Diffused light creates a more natural, healthy appearance and, in an interesting twist, can assist in balancing color temperature when using the same light diffuser (or DIY material) on various lights.
One intriguing aspect of using a diffuser is its compatibility with reflective materials for bouncing light. This combination offers control over the light’s direction, intensity, and the level of detail it reveals.
Previously, we touched on motivated lighting, which involves any out-of-frame light source enhancing, spreading, or influencing the practical light in the scene. Utilizing a light diffuser is instrumental in achieving motivated lighting.
The control it provides not only enhances the visual appeal of your footage but also transforms any light source into a tool for adding depth, interest, or emotion to a shot. This kind of versatility is invaluable for a visual storyteller in any video shoot.
How to Utilize Light Diffusion in Video Production
Imagine you’re filming outdoors, and the noonday sun is casting harsh shadows on your subject. Erecting an overhead sheet may not be practical, but waiting for a passing cloud can act as a natural diffuser, producing even light distribution.
However, relying on agreeable clouds is not always feasible. In such cases, your most practical solution is to acquire a good lighting kit, ideally one that incorporates a diffuser.
A dedicated softbox lighting kit is an excellent starting point, offering a versatile option. Alternatively, an umbrella diffuser is effective, though not as adaptable as softboxes. Both options present relatively affordable ways to diffuse light in your video projects.
If you already possess some lighting equipment, you might consider individual diffusers, although acquiring them separately may not be as cost-effective as buying a bundled kit.
However, these solutions primarily address video production in a controlled set environment. If you’re shooting outdoors or in a location with natural lighting, relying solely on a softbox or umbrella may not suffice. Perhaps you’re on a budget and can’t invest in a new lighting kit, but you still aspire to create diffused light for your upcoming project. What alternatives are available?
For a deeper understanding of lighting techniques and equipment, continue exploring: What is a lighting gobo?
Diffuse light photography and how to Diffuse Light
Creating Diffused Light Indoors: A Guide
Finding diffused light indoors is easily achieved through window light. Numerous natural-light photo studios strategically incorporate south-facing windows to harness consistent, diffused light throughout the day.
To achieve a naturally diffused close-up, position your subject near a window not directly exposed to sunlight. For an even softer effect, consider drawing a curtain across the window, ensuring it has some level of translucency.
For those seeking complete control over lighting, employing a softbox or other light modifier is a valuable option. Positioning the softbox at a thirty-degree angle from your subject produces a flattering look, or you can experiment with different light positions to discover a variety of looks and moods achievable with just one or two lights.
In summary, whether harnessing the soft glow of natural window light or utilizing sophisticated light modifiers, the possibilities for creating diverse and appealing indoor lighting are extensive.
Creating Diffused Light Outdoors: A Practical Approach
Achieving diffused light outdoors involves considering the desired aesthetic and leveraging either personal interventions or the natural elements.
On a sunny day, when dealing with harsh sunlight, employing a light modifier becomes essential. An excellent choice is a 5-in-1 reflector, offering versatility without the need for additional lights, stands, or power sources.
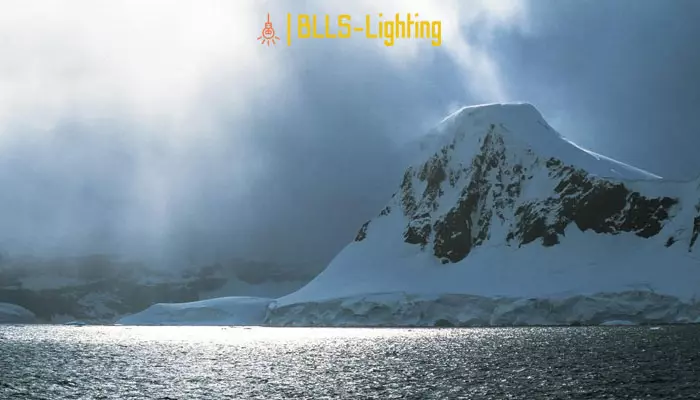
Alternatively, on cloudy days, nature provides an advantageous setting. Overcast conditions may not yield the most dramatic landscape photos, but the diffuse light created by the flat skies serves as a natural and effective diffuser, particularly beneficial for portrait photography.
Diffuse light with a professional diffuser
Use a camera flash diffuser
These accessories easily attach to your camera and employ various materials to soften the harshness of the flash. The market offers diverse models, each presenting a unique approach to light diffusion. Some diffusers work by bouncing light off the ceiling and channeling the rest directly toward the subject through the fabric, while others reflect the flash off a panel within the diffuser before guiding it through the fabric towards the subject.
Experiment with an array of softboxes
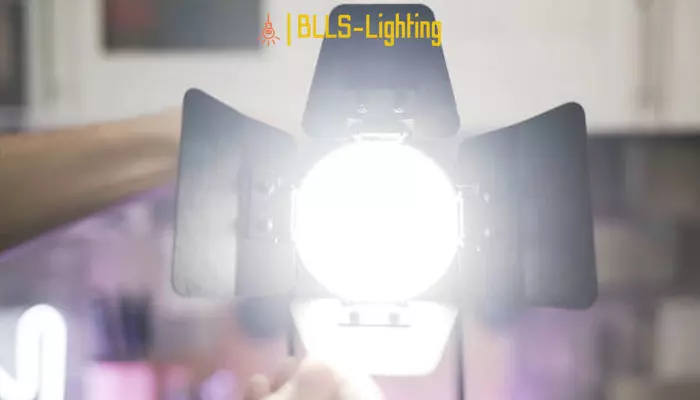
Softboxes, also known as lightbanks, are rectangular enclosures positioned over the light source, typically a flash, to impart a softening effect. These versatile devices generate diffused and directional light, akin to the gentle illumination filtering through a window.
Available in various sizes, the general rule is that larger softboxes produce softer and more diffused lighting.
The mechanism of most softboxes involves a reflective material lining that bounces light through a sheer fabric, contributing to the desired softened effect. When opting for a softbox, ensure that it can handle the wattage of the light source to avoid potential fire hazards associated with mismatched equipment.
Utilize an umbrella
Photography umbrellas serve as user-friendly tools that diffuse light in two distinct ways – by reflecting light off their surface or by diffusing it through the material.
Similar to softboxes, an umbrella is affixed to the light source and is commonly crafted from white fabric or a metallic silver material. Both types effectively diffuse light and are budget-friendly, with some options costing less than twelve dollars.
For light diffusion through reflection, direct the light source towards a silver or white umbrella, redirecting the light away from the subject. To diffuse light through the umbrella, opt for one made from sheer material, and position it in front of the light source with the aim of illuminating the subject effectively.
Try other light diffusion techniques
Soften the light using diffuser paper
These papers deliver a uniform field of soft light, ideal for gently enhancing the overall appearance of a shot. Available in various finishes similar to tracing paper, they offer different lighting effects.
These light-diffusing materials are cost-effective. In case of improvisation, consider using wax paper for a similar effect. However, it’s crucial to note that wax paper should only be employed for diffusing LED lighting. Exercise caution and avoid using wax paper with tungsten lights, as there is a potential fire hazard associated with such usage.
Place a silk screen between the light source and the subject
These professional silks, available in various sizes and typically mounted on a metal frame, effectively diffuse light when strategically placed in this setup. If you’re working within budget constraints, a comparable effect can be achieved using a sheer piece of fabric readily available, such as a white bed sheet or a clear shower curtain liner.
While this method may not yield identical results to a more sophisticated professional diffuser, it does contribute to light softening and aids in minimizing harsh transitions and shadows. Any light-colored sheer fabric can be utilized as a diffuser, and in a pinch, even a tissue can serve the purpose of a makeshift diffuser.
Use Chinese paper lanterns
These lanterns offer the advantage of diffusing light in multiple directions simultaneously, showcasing their versatility. Chinese lanterns are available in various sizes and colors, with the all-white ones being particularly effective for traditional light diffusion. For more unconventional lighting effects, consider experimenting with colored lanterns.
Procuring China balls is convenient, as they are accessible online, in most home décor stores, and at Asian markets. To grasp their application, envision hanging several lanterns from the ceiling to gently illuminate a scene, or opt for a single lantern to create a cozy ambiance in intimate settings, such as a restaurant dinner conversation.
Light Diffusion Improvisation
Wrap your camera flash with bubble wrap
Bubble wrap, a plastic packing material featuring tiny air-filled bubbles, serves as a cushioning material. To diffuse light using bubble wrap, cut a two-foot-long strip and securely wrap it around your camera’s flash. Fasten it in place using Velcro, gaffer’s tape, or a rubber band. Ensure that there is ample space left over the top after wrapping the bubble material around the flash.
For an even softer lighting effect, consider using two layers of bubble wrap. This simple yet inventive technique adds a touch of creativity to light diffusion.
Reflect light using a semi-reflective white surface
Whether it’s a white poster board, a whiteboard, or even white walls/ceilings, these surfaces can effectively bounce soft light. To achieve light diffusion through bouncing, direct your light source toward the chosen semi-reflective white surface. The light reflects off this surface, creating a secondary source that bathes your subject in diffused light.
Ensure that the light source is aimed away from the subject, allowing only the bounced light to be utilized, not direct light. This technique enhances the overall lighting quality by softening shadows and providing a pleasing, diffused illumination for your subject.
Try creating DIY silk
Typically, professional silks are fabrics positioned between the light source and the subject to achieve a diffused lighting effect. While white bed sheets and clear shower curtain liners work effectively, you can unleash your creativity and still attain pleasing, soft light with alternative options.
Experiment with an array of materials and objects to discover the range of diffusion possibilities. Consider using items like bath towels, visqueen, paper towels, white t-shirts or dress shirts, printer paper, and even opaque Tupperware. This experimentation allows for a personalized touch, enabling you to achieve unique and soft lighting effects tailored to your specific needs.
Conclusion
Understanding diffuse lighting is crucial for achieving desired visual effects in various settings, whether it’s in photography, cinematography, or interior design. By dispersing light evenly across a surface, diffuse lighting eliminates harsh shadows and creates a soft, flattering illumination that enhances the overall atmosphere of a scene or space.
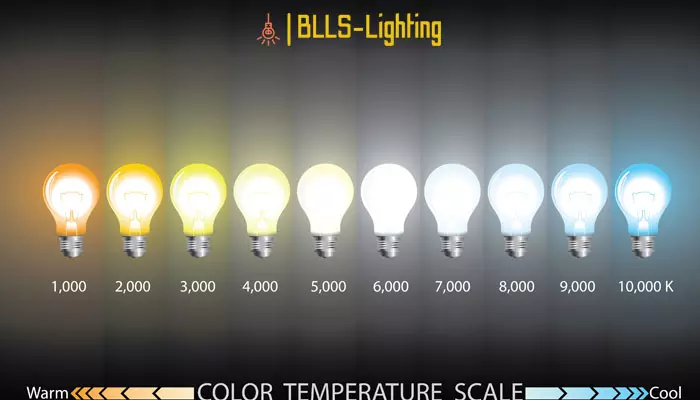
For further exploration into lighting terminology and its applications, including the meaning of CCT (Correlated Color Temperature), delve into our comprehensive guide on cct lighting meaning.